
Understanding the Essentials of Professional Tile Installation
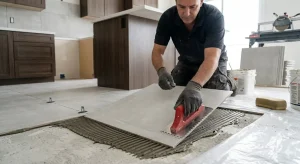
If you have ever walked into a room and felt instantly captivated by a stunning floor or a perfectly aligned backsplash, you have witnessed the art and science of professional tile installation. It is a process that blends structural integrity with aesthetic precision, transforming raw materials like porcelain, ceramic, or natural stone into a durable surface.
In 2026, homeowners are looking for more than just a quick fix, they want longevity and high performance. Tile installation is the technical method of bonding individual tiles to a solid substrate using specific adhesives and finishing them with grout to create a seamless, water-resistant, and aesthetically pleasing barrier.
Whether you are planning a bathroom remodel or updating your kitchen floors, knowing how this process works ensures you make the right choices for your property. It is not just about laying pieces down, it is about engineering a floor system that can withstand the unique humidity and traffic of a Florida home.
Who Performs Tile Installation and Why Professionalism Matters
While some enthusiasts attempt DIY projects, most complex layouts require a licensed flooring contractor. These specialists understand the structural requirements and the chemical properties of the mortars used to ensure the tile does not “pop” or crack over time.
Investing in a professional ensures that the layout is centered, the cuts are clean, and the waterproofing is handled correctly. This is especially vital in wet areas like showers and steam rooms where even a small error in the installation process can lead to costly water damage behind the walls.
Where Tile Installation Can Be Applied in Your Home
Modern tile setting is versatile, allowing for applications in almost every corner of a residence. From high-traffic entryways that need scratch-resistant porcelain to elegant marble accent walls in a master suite, the possibilities are nearly endless in 2026.
Kitchen Floors and Backsplashes: Providing easy-to-clean surfaces that resist heat and stains.
Bathroom Walls and Showers: Essential for moisture control and hygiene.
Outdoor Patios: Using frost-proof or high-density tiles to handle Florida’s weather.
Pool Decks: Utilizing slip-resistant textures for safety.
The Technical Steps of the Tile Installation Process
Understanding the workflow of a tile project helps you prepare your home for the transformation. It is a multi-day process that requires patience and precision to allow for proper curing of materials.
Subfloor Preparation and Assessment
Everything starts with the substrate. You cannot install high-quality tile on a bouncy or uneven surface. Professionals spend a significant amount of time assessing the subfloor, whether it is a concrete slab or a plywood subfloor in a second-story room.
If the floor is not level, a self-leveling underlayment is applied. For wood floors, a cement backer board or an uncoupling membrane is installed to prevent the wood’s natural movement from cracking the rigid tile above it. This stage is where the “health” of your new floor is determined.
Choosing the Right Adhesives and Thin-set
In 2026, we use advanced polymer-modified thin-set mortars. These adhesives are engineered to provide a flexible yet incredibly strong bond. The choice of thin-set depends on the tile type and the environment, for example, large format tiles require a specific medium-bed mortar to prevent sagging.
The Importance of Layout and Dry Fitting
Before a single drop of mortar hits the floor, a dry lay is often performed. This allows the tile installer to visualize the pattern and ensure that there are no awkward “sliver cuts” at the edges of the room. It is about achieving geometric symmetry that guides the eye naturally across the space.
Cutting and Fitting Specialized Tiles
Using wet saws with diamond blades and manual tile cutters, the technician fits the pieces around obstacles like pipes, cabinets, and corners. This is where the skill of a craftsman truly shines, ensuring that the expansion joints are maintained and the edges remain smooth and safe.
Comparing Tile Materials and Installation Requirements
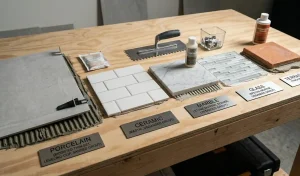
Not all tiles are created equal, and their installation methods vary based on their physical properties. Below is a breakdown of common materials used in Florida residential projects this year.
| Tile Material | Typical Use Case | Installation Difficulty | Maintenance Level |
| Porcelain | High-traffic floors | Moderate | Very Low |
| Ceramic | Walls and backsplashes | Easy | Low |
| Marble/Stone | Luxury bathrooms | High (Requires Sealing) | Moderate |
| Glass Tile | Pool lines/Accents | High (Specific Mortar) | Low |
| Terracotta | Rustic patios | Moderate | High (Porous) |
Setting the Tile into the Mortar
Once the layout is confirmed, the thin-set is combed onto the floor using a notched trowel. The size of the notches corresponds to the size of the tile. Each piece is firmly “beat in” to ensure 95% mortar coverage for interior floors, ensuring there are no hollow spots that could lead to breakage.
Utilizing Leveling Systems for a Flat Finish
To eliminate lippage, which is when one tile edge is higher than its neighbor, we use modern tile leveling systems. these clips and wedges hold the tiles in a perfectly flat plane while the adhesive dries, a standard requirement for rectified tiles and modern aesthetic standards in 2026.
Grouting and Final Finishing Touches
The final functional step is grouting. The grout fills the spaces between the tiles, providing structural stability and preventing debris from entering the joints.
Selecting Grout Types: Sanded vs. Unsanded vs. Epoxy
The width of the grout joint determines the type of material used. For joints wider than 1/8 inch, sanded grout is typically used to prevent shrinkage. For delicate glass or tight joints, unsanded grout is the go-to. However, for maximum stain resistance in 2026, epoxy grout is becoming the gold standard for kitchens and bathrooms.
Cleaning and Curing Times
After the grout is applied, the “haze” is cleaned off using specialized sponges and clean water. It is crucial to let the installation cure for at least 24 to 48 hours before walking on it or applying any sealants. Rushing this stage can compromise the bond and lead to shifting tiles.
Frequently Asked Questions About Tile Services
How long does a typical tile installation take?
Most residential projects take between three to five days. This includes a day for prep and layout, a day for setting, and a day for grouting and cleanup. Larger areas or intricate patterns like herringbone may require additional time.
Why do I need a waterproof membrane in my shower?
In 2026, we know that tile and grout are not 100% waterproof. They are water-resistant. A waterproof membrane (like Schluter-Kerdi or liquid-applied barriers) is the “insurance policy” that keeps the structure of your home dry behind the beautiful finish.
Can I install new tile over old tile?
This is possible through a method called tile-over-tile, but it requires a perfectly sound existing floor and a specific bonding primer. However, for the best long-term results, we usually recommend a full demolition to inspect the subfloor.
Achieve a Flawless Finish with RND TILE
At RND TILE, we specialize in turning your vision into a reality through expert tile installation techniques. Whether you are looking for a sleek modern look or a classic stone finish, our team ensures every cut is precise and every joint is perfect. We take pride in our craftsmanship and our commitment to using the highest quality materials available in 2026.
Ready to transform your home with a stunning new floor or bathroom? Don’t leave your project to chance. Experience the difference that professional expertise makes.
Call us today at (321) 471-3162 to schedule your consultation and get a professional estimate!
Tile Installation in Melbourne, FL
Tile Installation in Palm Bay, FL
Tile Installation in Cocoa Beach, FL
Tile Installation in Satellite Beach, FL
Tile Installation in Sebastian, FL
Tile Installation in Vero Beach, FL
Tile Installation in Merritt Island, FL
Tile Installation in Melbourne Beach, FL
Tile Installation in Rockledge, FL
Tile Installation in Port Saint John, FL
Tile Installation in Titusville, FL
Tile Installation in Cape Canaveral, FL
Tile Installation in Florida Ridge, FL
Tile Installation in Lakewood Park, FL
Tile Installation in Fort Pierce, FL
Tile Installation in Port St. Lucie, FL